In this how-to article I will explain the procedure how to install a new certificate on a Citrix NetScaler. Certificates are an important piece in a secure connection from a client to a server.
This article assumes you already have a valid certificate (pfx without the root and intermediate) available with matching password. You can also follow this article to export a certificate with private key to a pfx file from a windows machine.
First login to the NetScaler with enough permissions to install the certificate.

Next browse to “Traffic Management” (1) / “SSL” (2) / “Certificates” (3) / “All Certificates” (4)
Next click on “Install” to add the new certificate.

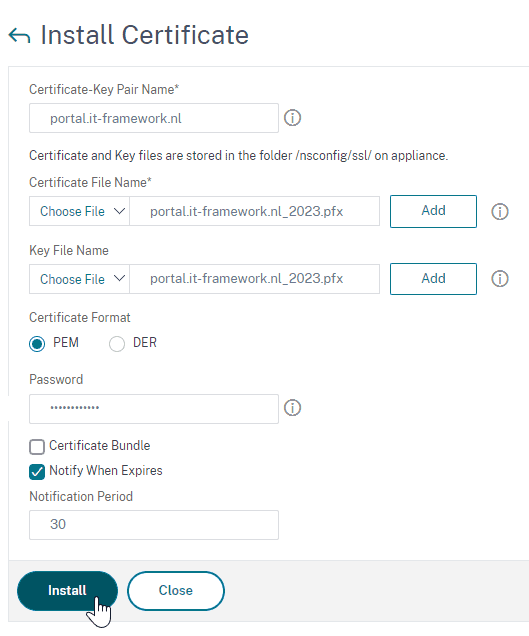
To select the certificate, click on the down “˅” symbol and select “Local“.
An open dialog box will appear and you can select the pfx-file.

Enter a name for your certificate in the “Certificate-Key Pair Name” field.
I typically like to use the same name as in the common name of the certificate. I don’t like to add dates or other extra additions. As this can be mis leading next time as you update this certificate.
Select the “Certificate Format” in this case “PEM“
Enter the password for the pfx file, this password will be saved in the configuration. The NetScaler will keep the certificate in the pfx format this way.
You can leave the “Notify When Expires” option enabled. This wil only work (notify you) when you have SNMP configured or use an ADM appliance or service.
Finally click “Install” to install the certificate.
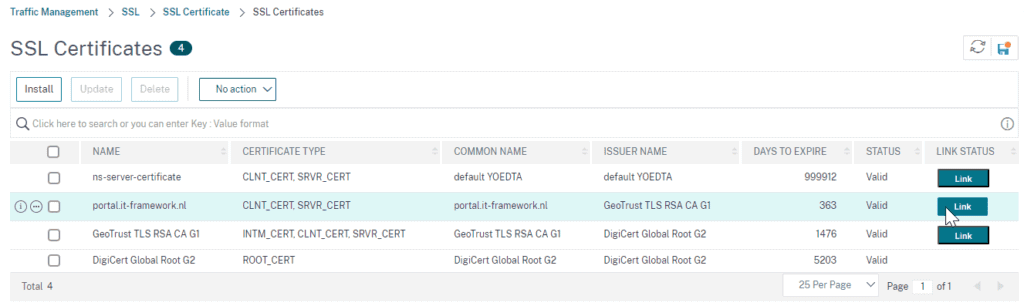
If all goes well, the certificate is added to the list.

A certificate needs a chain (of trust). In most cases the Root and sometimes the intermediate is already available on your client. There are cases where those are not present. To make sure a full chain is available on the client you can send the intermediate(s) and root to your client by configuring this on the NetScaler.
To make the chain available you first have to add the certificates to the NetScaler. Next you have to bind them together.
The proces is basically the same as with the pfx with the only difference that we don’t specify a key and password.
Enter a “Certificate-Key Pair Name”, same as with the pfx I like to use the Common Name of the intermediate or root.
Select the certificate file and select “Install“

Repeat the proces for all intermediate certificate(s) and root certificate.
When all certificates are added we can continue making the link between the intermediate(s) and root.
Select the certificate we added earlier as pfx file and at the end click on the “Link” button.
You will be presented with an overview. If the certificate is not yet linked you see missing certificate symbols for the intermediate(s) and root.
Just click the “Link Certificates” button to complete the links.

When all goes well, you will see a full (green) line with certificate symbols under the intermediate and root certificate(s).

And that’s it. You can now bind the certificate to your VIP.